
Oyster Mushrooms on Straw
Pasteurise chopped straw, layer it with spawn in perforated bags, and crop oyster mushrooms in a dark shed within a month — high value from crop waste.
- Estimated cost
- $15 – $50 per production cycle
- Skill level
- Intermediate
- Time
- 3 – 4 weeks to first flush, cropping over 6 – 8 weeks
Not yet verified
No confirmed build with photo proof has been submitted for this plan yet. Built it? Send photos and it earns the badge.
Tools
- Drum and fire for hot-water pasteurising
- Thermometer
- Chopping blade or chaff cutter
- Clean buckets and a table
- Spray bottle and misting hose
If you don't have it
- No autoclave or drum steriliser? Lime-water soak (1% hydrated lime, 18 hours) pasteurises straw cold and needs no fuel.
Materials
- Clean cereal straw or maize stover, chopped to 50 mm
- Oyster mushroom (Pleurotus) grain spawn, 3 – 5% of wet substrate weight
- Clear or white polythene bags, 400 × 600 mm
- Hydrated lime for a cold-lime alternative pasteurisation
- Alcohol or bleach for surface sanitising
Dimensions & cut list
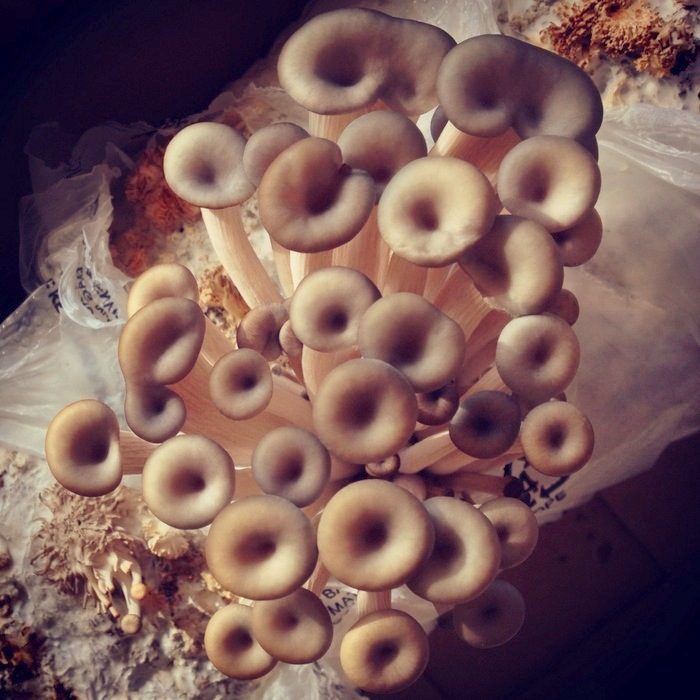
Pasteurised straw bags of oyster mushrooms in a shaded, high-humidity growing room. These are the reference sizes from Appropedia / small-scale mushroom cultivation guides — scale them to what you have, but keep the ratios.
| Bag size | 40 × 60 cm polythene, filled to ≈ 6 kg wet substrate |
|---|---|
| Substrate | Chopped straw or maize stover 3–5 cm long |
| Pasteurisation | Steep or steam at 65–80 °C for 1 hourBoiling kills too much — you want pasteurised, not sterile |
| Substrate moisture after draining | 65% — a squeezed handful drips two or three drops only |
| Spawn rate | 5% of wet substrate weight, layered every 10 cm |
| Incubation | 20–28 °C, dark, 14–21 days until the bag is fully white |
| Fruiting | 85–90% humidity, indirect light, slit the bag; first flush in 5–7 days |
| Yield | ≈ 1 kg fresh mushrooms per bag over 3 flushes |
Take this list to the yard
- 1 per 6 kg substratePolythene bags
- 300 g per bagOyster spawn
- 1 × 200 litreDrum for pasteurising
- 1Shade structure with mister or hand sprayer
Step by step
Step 1 of 6
Chop and soak the straw
Chop to 50 mm and soak overnight. Short, wet straw packs without air gaps; long straw leaves voids where contaminants take hold.
Swipe or use arrow keys
1. Chop and soak the straw
Chop to 50 mm and soak overnight. Short, wet straw packs without air gaps; long straw leaves voids where contaminants take hold.
2. Pasteurise, do not sterilise
Hold at 65 – 80 °C for 60 – 90 minutes in a drum, then drain and cool to below 30 °C. Boiling kills the helpful microbes too and invites green mould.
3. Squeeze to the right moisture
A handful should release a few drops when squeezed hard, not a stream. Too wet is the single most common cause of failed bags.
4. Layer substrate and spawn in clean conditions
Wash hands and wipe the table with alcohol. Fill bags in layers — 100 mm straw, a sprinkle of spawn — press firm, tie the top, then punch 10 mm holes every 100 mm.
5. Incubate dark and warm
Stack in a dark room at 24 – 28 °C for 2 – 3 weeks until the bag is fully white. Discard any bag showing green, black or sour-smelling patches immediately.
6. Fruit with light, air and humidity
Move to indirect light with fresh air and mist 2 – 3 times daily to keep humidity high. Harvest by twisting the whole cluster just as the cap edges start to flatten.
Why mine failed
The ways this build usually goes wrong, and what fixes it.
Green mould takes over the bag
CauseSubstrate over- or under-pasteurised, or dirty hands at spawning
FixHold 65–80 °C for one hour — boiling sterilises and leaves nothing to compete with mould. Wash and dry hands and tools, and spawn in a clean, still room.
Bag colonises but never fruits
CauseToo warm, too dark or too dry at fruiting
FixMove bags to indirect light, keep humidity at 85–90% with several light sprays a day, and slit the bag. Oysters need a drop in temperature and fresh air to pin.
Mushrooms small with long stems
CauseNot enough fresh air
FixOpen the growing room for cross-ventilation. Long stems and small caps are the classic CO2 signal.
Safety notes
- Mushroom spores at harvest can cause respiratory irritation — ventilate the fruiting room and wear a mask during heavy flushes.
- Never eat mushrooms from a contaminated bag; discard the whole bag away from the growing area.
- Buy spawn from a known supplier and grow only species you can identify with certainty.
- Hot pasteurisation drums scald. Use long gloves and a lid hook.
Source & attribution
This plan is our build-step write-up of work documented by Appropedia / small-scale mushroom cultivation guides. The original design and documentation belong to them — go read the source before you build.
Mushroom cultivationLocal adaptations
What builders changed to make this work where they live.
- No adaptations shared yet for this plan.
Build this alongside
Plans that use the same materials or serve the same need.
Lime and Earth Plaster for Earthen Walls
A breathable three-coat render that protects mud, adobe and earth-block walls from rain without trapping moisture the way cement does.
Movable Chicken Tractor
A floorless, lightweight coop you shift daily so birds get fresh forage, the ground gets manured, and nobody has to muck out.
Lined Tilapia Fish Pond
A hand-dug, lined pond stocked with tilapia and fed on farm waste — a protein and income source that also stores irrigation water.